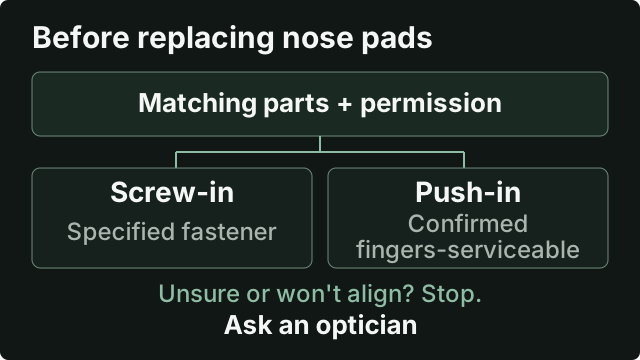
To replace a screw-in nose pad, remove its retaining screw and old pad, align the replacement with the mount, then reinsert and secure the specified fastener. A confirmed fingers-serviceable push-in assembly uses finger removal and seating instead. The method depends on the connection and its service directions.
These steps are for wearers or retail staff who already have an identified, compatible separate replacement pad and matching hardware, with exact-assembly instructions permitting them to do the work. A separate pad, an invisible screw or a generic repair kit does not establish that permission. If the connection or instructions are uncertain—or you are concerned about damaging a lens, mount or frame—take the glasses to the dispensing retailer or a qualified optician before starting.
General guides differ on home replacement. All About Vision’s guide, written by Meredith Marmurek and reviewed by Chloe Tauaefa, ABOC, describes home screw-in replacement. Stenberg College recommends a certified optician because a screwdriver can slip and scratch a lens. Neither guide is approval to service a particular frame.
If dirt is the only concern, use the permitted care for reachable surfaces with the pads attached, or ask for assessment. Removing a pad is not a cleaning workaround, and discoloration alone does not establish that it needs replacement.
Prepare before removing the old pad
Have the replacement ready before disassembly. For a screw-retained pad, also have the specified matching fastener and a screwdriver that fits its head. Set up a well-lit, uncluttered work surface with a clean cloth and a small parts tray for removed hardware. EBJDE’s replacement guide supports this preparation and the importance of a properly fitting driver.
The nose pad is the part that contacts the nose; its supporting arm or holder is a separate component. Our guides to nose-pad attachments and eyeglass frame parts explain that distinction if you need to confirm what you are looking at. Stop before undoing anything if the connection is unclear or the mount is visibly damaged.
For the screw-in sequence, cover the lenses with the clean cloth and hold the glasses by the bridge, as described in All About Vision’s guide, within the frame’s applicable handling directions. The cloth is a precaution; it does not make a slipping screwdriver harmless.
Replace a permitted screw-in nose pad
The following sequence draws on All About Vision’s screw-in replacement instructions. Use the assembly directions for fastener operation and the required reassembly endpoint; a general guide cannot supply those details for every frame.
Remove the retaining screw and old pad
Engage the pad’s retaining screw with the matching driver. Undo it according to the assembly directions, then remove the old pad. Put the removed screw in the parts tray so it remains available.
If the driver does not engage properly, the fastener will not release or the hardware looks damaged, stop there. Do not keep turning or switch to an improvised extraction tool. Keep the pieces for the optician.
Align the replacement before reinserting the fastener
Position the replacement at the mount in the orientation specified for that assembly. Line up the pad and arm holes, and hold the pad in place for reassembly.
The holes should align naturally. If they do not, stop rather than driving a screw through, enlarging a hole or bending the arm. EBJDE’s alignment guidance specifically cautions against bending the arm to accommodate an incompatible pad. A similar-looking pad is not proof of a matching connection.
Reassemble according to the assembly directions
Reinsert the specified matching fastener through the aligned pad and mount. Secure it as the assembly instructions require, without forcing it. Avoid extra tightening in an attempt to resolve uncertainty; overtightening can damage the small hardware.
If the fastener will not engage or the pad cannot be held as expected, stop. Do not substitute an unconfirmed screw or alter the support to compensate. Continue to the observations below only after completing the permitted reassembly.
Use the push-in method only for a confirmed fingers-serviceable assembly
No visible screw does not automatically mean a pad can be pushed out. A rectangular back, or a name such as “snap-on,” is also insufficient. Slide, clip, crimp, proprietary and integrated connections need their own service instructions or professional attention; this branch does not describe their removal.
For an assembly already confirmed as permitting fingers-only replacement:
- Remove the old pad with your fingers using the assembly’s removal directions. If it will not release that way, stop.
- Align the replacement’s matching stem with the opening in the receiving holder.
- Seat it with your fingers as directed, without forcing. If it will not align or enter readily, stop rather than deforming the holder.
Specscart’s retailer guide describes finger removal and seating; EBJDE’s commercial guide corroborates stem alignment and stopping when it will not enter readily. These are general commercial guides, not exact-model service manuals. Do not add a knife, levering tool or clip-spreading step to this fingers-only method.
Check the result without trying to adjust the frame
After reassembly, use these questions as observations—not a test of retention or fit:
- Is there visible damage to the pad or mount?
- Is the pad obviously unseated?
- Is there unexpected looseness compared with what the assembly directions describe?
If you notice a concern, stop and seek assessment. Some pad movement may be part of the design, so movement alone is not proof of a fault. A visual check cannot establish correct fit, retention or durability. Do not respond to an unexplained concern by tightening again or bending the supporting arm.
Take the glasses, removed pad and retained hardware to the dispensing retailer or a qualified optician. Explain where work stopped: removal, hole alignment, screw engagement or push-in seating. The same professional route is available if you prefer not to begin the work yourself.
For retailers, keep the applicable model’s approved service information with its customer directions. Our frame-care guide covers obtaining care information for the exact model.